Print the Invoice in Pre-print Format using Crystal Report


This post Explains how to Print the invoice in Pre-Print format(The format is given below).


Step 1 : Add new Crystal report.

Step 2 : Specify the margin.
Scale the Margin from your Invoice template(Refer the below image).
Select & Specify the Paper size & Margin(Refer the below image)
(To open Page setup dialog box right on Crystal report->Design->Page Setup)
Step 3 : Drag & Drop the field from Field Explorer to Crystal Report.(Refer below Image)
Step 4 : Measurement Unit Settings(Optional).
Use the Ruler at left & top of report when place the report field. You can change the Measurement unit from Centimeter to Millimeter or vice versa(Refer below Image)
* US - Inches
* Metric - Centimeter

Change your measurement system as per your requirement and close and re-open the report in Visual Studio.
(To change Measurement Option - Control Panel -> Regional Settings - > Change Date, Time & Number formats)
I always prefer Metric unit(Centimeter). Because we can scale exact dimension and location in millimeter unit.
Preview the Report
Step 5 : Incorporate the report
Add a Command button in Invoice List form
Change the caption to "Print(A4 Pre-Print Format)"

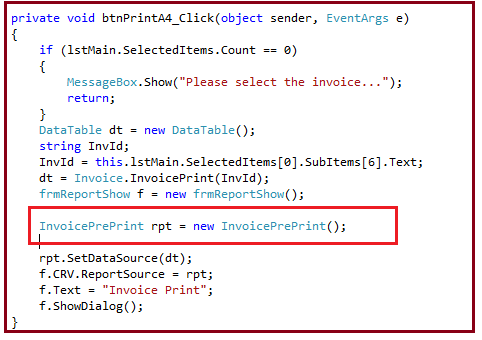
Step 6 : Add below mentioned code in Click Event.
Step 7 : Preview the Report
Points to Remember
  • All points are measured in centimeter unit.
  • The alignment may vary at 1 to 2 millimeter level.
  • Before start to design the report,Fixed the Pager Size, Margin,font and Font size.
  • Take 1 or 2 test print and adjust the field position as per your requirement.
  • Ensure that You have installed Proper Printer Driver.

Comments

hsraletta said…
Once upon a time there was no options for maintaining accounts of business but in present there are a lot of options of accounting software for every one small business. online invoice software.

Popular posts from this blog

Print the Invoice in Computer Stationery using Dot Matrix Printer

This post Explains how to Print the invoice in Pre-Print format(Continuous paper/Multipart forms). Sample Format Please go through my previous article before start. The alignment & Scale process is same for Laser & Dot matrix Printer. Continuous Paper Feeding Method(Refer the Image) Make sure your paper has a clean, straight leading edge. Open the sprocket covers. Fit the first holes of the paper over the sprocket pins and then close the sprocket covers. Slide the right sprocket to remove any slack in the paper and lock it in place. Turn on the printer. Press the "Load/Eject" button. Now the paper will feed automatically and stop at corresponding position. You should not use "Knob/Roller" to adjust the position. Adjust the Paper thickness lever. Because you may need to print multi-part paper. Paper Type Lever Position Standard Paper(Single Sheets or continuous) 0 Multipart

Invoice,Billing Application(Software)

Introduction This is a simple billing project which was developed using C# & SQL Server 2005. You can use it for all type of invoice/Bill preparation after small modification. Download Project Download SQL Script Video in Youtube Create Database There are two ways to create a database.          1. SQL Management Studio Query Analyser.          2. SQL Management Studio Visual Tool. The following sql script create a database with default option using SQL Management Studio Query Analyser. CREATE DATABASE [MyBill] (where MyBill is a name of database) Open SQL Server Management Studio Express and execute the above mentioned query. Create a database using SQL Server Management Studio Express Right Click on Databases. Select  New Database...  from the popup Type your database name(Eg. "MyBill") Select "OK" Table Creation Table Name